
(Image credit: Tom’s Hardware)
While online advertising is a major revenue source that allows your favorite websites, including this one, to make money, sometimes people want to block it for various reasons such as performance or privacy concerns. You could install blocking software on each device you own, but the most efficient way is to create a server using Pi-hole that filters all your web traffic at the local network level.
Pi-hole is a Raspberry Pi based network wide ad blocker. We install the software to a Raspberry Pi running Raspberry Pi OS, run a short installation script and then point our machines to the Raspberry Pi’s IP address for instant ad blocking. We can also — and we strongly encourage this — add the sites you use frequently like tomshardware.com to a whitelist so you can help them keep the lights on.
In this tutorial we will turn a spare Raspberry Pi into an ad blocking machine, tucked safely away on our network. We used a Raspberry Pi 4, but given the low requirements for Pi-hole, this is an excellent chance to resurrect that old Raspberry Pi that you have lurking in a drawer.
For This Project You Will Need
- Any Raspberry Pi with Ethernet
- Power and Ethernet cable for your Raspberry Pi
- A Windows PC
Setting Up Your Raspberry Pi
1. Download and install Raspberry Pi Imager from the Raspberry Pi website.
LATEST VIDEOS FROM tomshardware
2. Insert a spare microSD card into your computer. Note that this card will be erased.
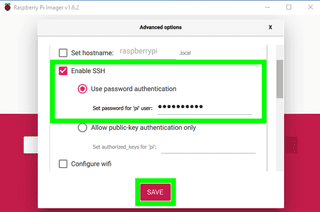
3. Launch Raspberry Pi Imager and press SHIFT + CTRL + X to open a secret configuration menu.
4. Scroll down and click on Enable SSH and then set a new SSH password. Click Save when done.
Stay On the Cutting Edge: Get the Tom’s Hardware Newsletter
Get Tom’s Hardware’s best news and in-depth reviews, straight to your inbox.Contact me with news and offers from other Future brandsReceive email from us on behalf of our trusted partners or sponsorsBy submitting your information you agree to the Terms & Conditions and Privacy Policy and are aged 16 or over.
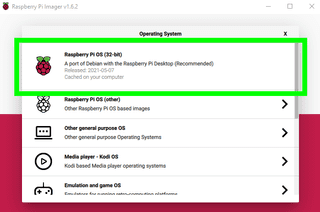
5. Under Operating System select Raspberry Pi OS (32-bit).
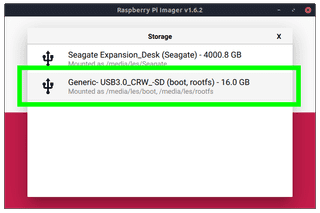
6. Under Storage click on the button and select the microSD card. Double check that you have the right drive before proceeding.
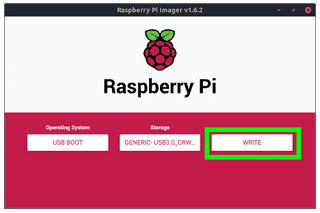
7. Click on Write to download and write Raspberry Pi OS to the microSD card. When done remove the card from your computer.
8. Insert the Raspberry Pi OS microSD card into your Raspberry Pi. Then connect your Raspberry Pi to the network via an Ethernet cable and finally connect power to boot the Raspberry Pi.
Installing Pi-hole Over SSH
SSH, a secure connection to your Raspberry Pi, is the best way to install and setup Pi-hole. We can use an SSH client to connect. For Windows this is PuTTY, and Mac, Linux users can directly connect via the terminal. With SSH we can install software and administrate the Raspberry Pi as if we were sitting in front of it.
1. Windows users, download and install PuTTY. Linux and Mac users can directly open a terminal.
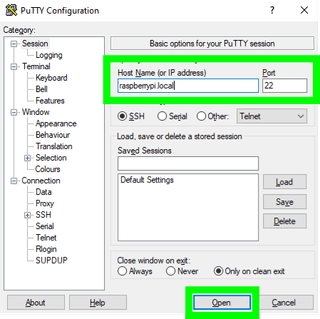
2. Via PuTTY enter the hostname as raspberrypi.local (on some networks, this is just raspberrypi without the .local) and then click Open.
3. Enter your username and password when prompted. Note that these are not printed to the screen for security purposes.
4. Update your software repositories and then download the latest updates for your Raspberry Pi.
$ sudo apt update
$ sudo apt upgrade -y
5. Install Pi-hole using this one line installation script. This command will download the script and then run the installer in the terminal.
$ curl -sSL https://install.pi-hole.net | bash
6. The Pi-hole installer will start by updating the available software, and then a menu based installation wizard will start. Press Enter to progress through the installation.
7. Choose eth0 as the interface to use with Pi-hole. Press Tab to move the red highlight to Ok and then press Enter. This is our Gigabit Ethernet port which will provide the best possible connection.

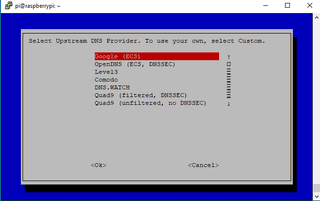
8. Select your upstream DNS provider. We chose Google, but there are many others to choose from. Press Tab and then Enter.
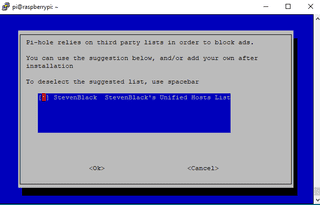
9. Accept the default list of blocked sites by pressing tab and enter.
10. Accept the default IPv4 and IPv6 protocols by pressing tab and enter.
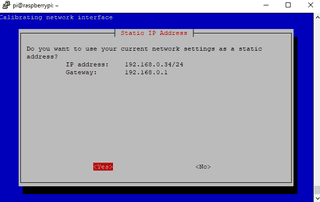
11. Accept the current network settings, and set them as static. Do make a note of the details as we will need them later.
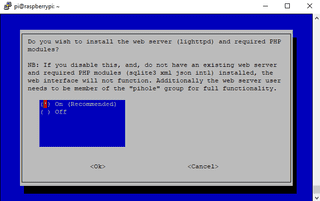
12. Install the web admin interface by pressing tab and enter.

13. Install the lightppd web server used to serve the web admin pages by pressing tab and enter.
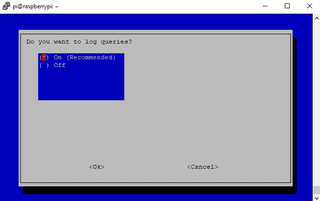
14. Accept the default log options.
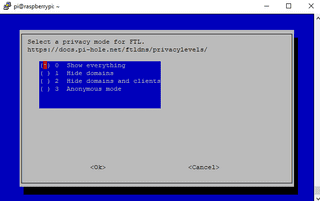
15. Accept the default privacy mode by pressing tab and enter.
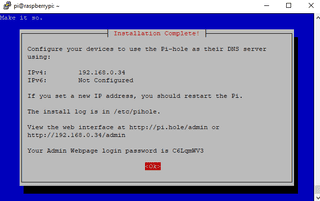
The installation is complete and the final page recaps the IP address of the Pi-hole device and provides an admin webpage login password.
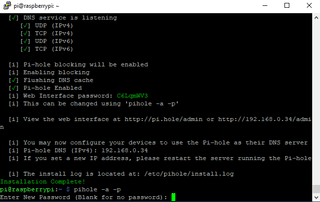
16. Change the web admin password in the terminal using the following command. You will be prompted to type in the password twice.
$ pihole -a -p
Setting Network Connections for Pi-hole
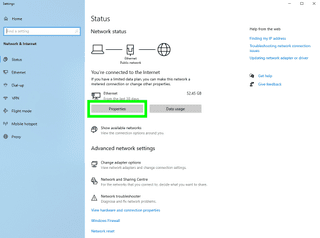
With our Raspberry Pi running Pi-hole setup and running we now need to point our devices to it so that Pi-hole’s DNS servers can block unwanted advertisements. Here we are manually setting up a wired network connection with Windows 10. The steps will be similar for Wi-Fi.
1. Right click on the Windows logo and select Network Connections.

2. Click on Properties.
3. Click on Edit to update the network configuration.
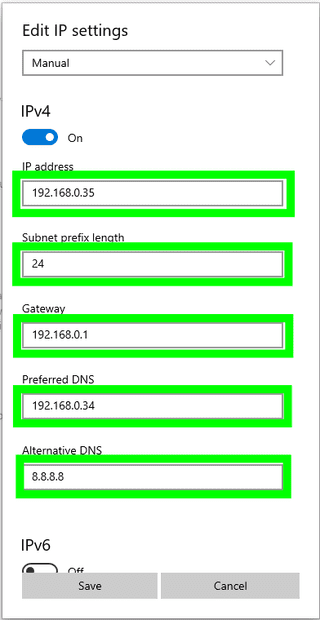
4. Edit your IP address to your desired address. We chose to stick with what the router’s DHCP server issued. Set the Subnet prefix length to 24. The Gateway is the IP address of the router, in our case 192.168.0.1. Preferred DNS is our Pi-hole DNS server, 192.168.0.24. The Alternative DNS is used if our Pi-hole device goes offline, in this case it is Google’s DNS server. Click Save to write the changes and restart the network interface.
How to Whitelist a Site in Pi-Hole
Considering that many content sites, including ours, rely on advertising for a significant portion of their revenue, it makes sense to whitelist those you wish to support so they can serve you ads. Pi-hole has a whitelist menu where we can add specific domains and subdomains which will be added to Pi-hole’s lists.
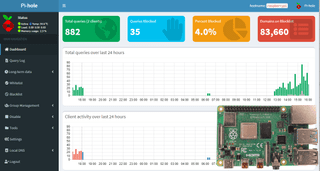
1. Open a web browser to the IP address of your Raspberry Pi, and type /admin. For our setup we went to http://192.168.0.34/admin/
2. Log in to your Pi-Hole by entering the username and password. We earlier changed the admin login password.
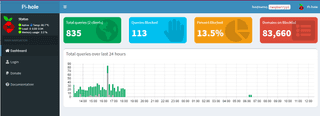
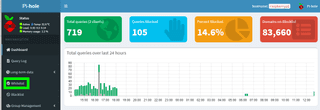
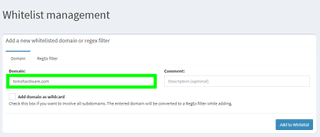
3. From the dashboard click Whitelist.
4. Under Domain, add the URL of the site that you wish to whitelist, then click Add to Whitelist. This site will now be able to serve adverts.
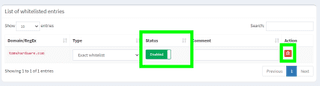
Domains can be enabled / disabled in the whitelist by clicking on the button under Status. Whitelisted domains can be deleted by clicking on the trashcan icon.
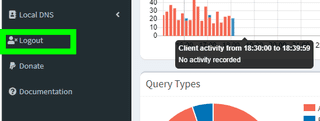
5. Click logout to return to the default admin page.
There you have it, your browser tabs are free of adverts and your browsing just got a lot faster, all thanks to that spare Raspberry Pi that was lurking in your drawer.

