
ESPHome Smart Speaker Setup
This is a simple WIFI connected speaker to transmit audio. It’s sole purpose is to play notification sounds or music.
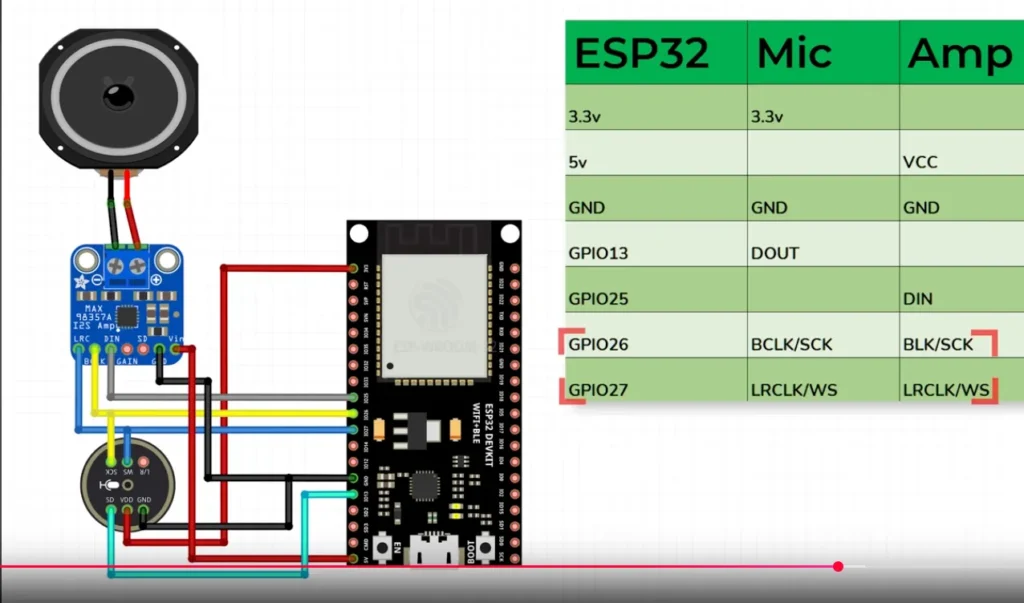
Speaker only wiring. ESP32 + DAC
| ESP32 | WCMCU – 1334 | MAX98357A | PCM5102A |
| GND | GND | GND | GND |
| 5V | VIN | VIN | 5V |
| GPIO27 | WSEL | DIN | LCK |
| GPIO26 | DIN | BCLK | DIN |
| GPIO25 | BCLK | LRC | BCK |
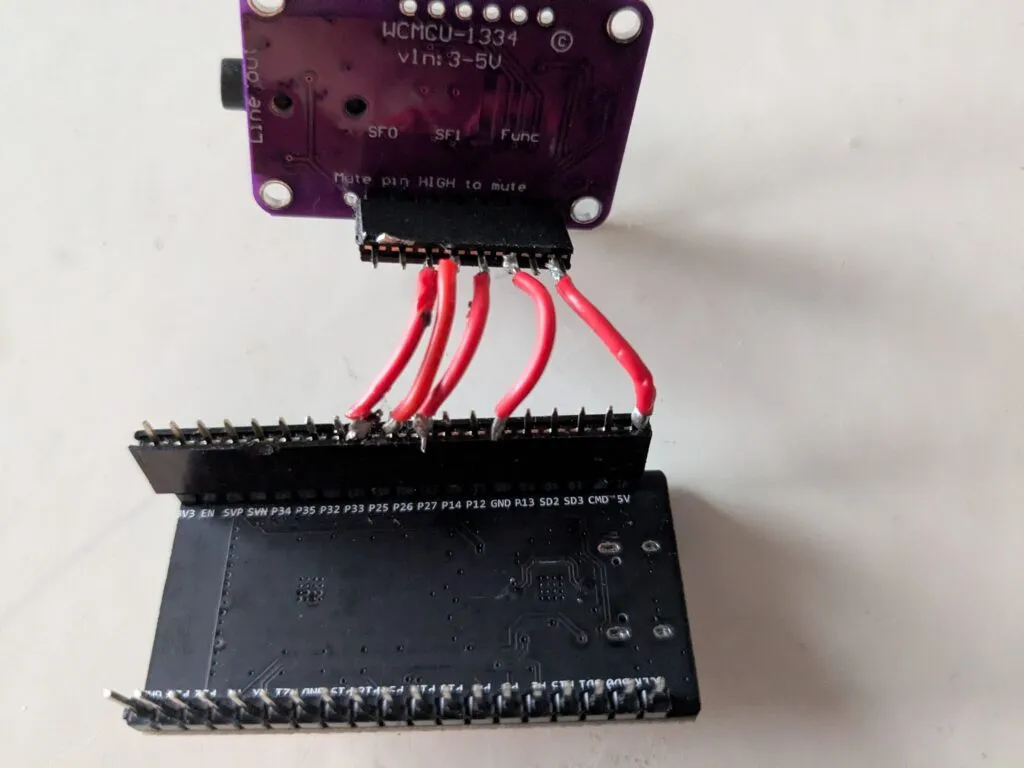

PCM5102A
PCM5102A has additional soldering requirements in order to work well with esphome. There are a couple of pads on its back that need to be solder bridged.
H1L (FLT) = L
H2L (DMP) = L
H3L (XMT) = H
H4L (FMT) = L (most important, sets the audio format to I2S)

SCK to GND bridging may also be necessary in case of weird sound.
https://community.home-assistant.io/t/i2s-audio-with-pcm5102a/739461
🔧 ESPHome Smart Speaker Setup
1. Install ESPHome Builder
- In Home Assistant, go to Add-ons → add ESPHome Builder.
2. Configure Wi-Fi Secrets
Click Secrets (upper right in ESPHome Builder tab) and add:
# Your Wi-Fi SSID and password
wifi_ssid: "wifi-name"
wifi_password: "wifi-password"
For multiple Wi-Fi networks:
# Your Wi-Fi SSID and password
1_wifi_ssid: "TheNameOfNetwork"
1_wifi_password: "PasswordOfNetwork"

2_wifi_ssid: "TheNameOfNetwork"
2_wifi_password: "PasswordOfNetwork"
3. Create New Device
- Click + New Device → Continue.
- Enter a name, select ESP32, click Skip.
- Open the new device → EDIT.
- Change framework type to arduino.
- Add the speaker configuration at the end:
WCMCU-1334
#Speaker
i2s_audio:
  i2s_lrclk_pin: GPIO27
  i2s_bclk_pin: GPIO25

media_player:
  - platform: i2s_audio
    name: SmartSpeakerPlayer
    dac_type: external
    i2s_dout_pin: GPIO26
    mode: mono
MAX98357
#Speaker
i2s_audio:
  i2s_lrclk_pin: GPIO25
  i2s_bclk_pin: GPIO26

media_player:
  - platform: i2s_audio
    name: SmartSpeakerPlayer
    dac_type: external
    i2s_dout_pin: GPIO27
    mode: mono
PCM5102A
#Speaker

i2s_audio:
  i2s_lrclk_pin: GPIO27
  i2s_bclk_pin: GPIO25

media_player:
  - platform: i2s_audio
    name: SmartSpeakerPlayer
    dac_type: external
    i2s_dout_pin: GPIO26
    mode: stereo
4. Example Config (Single Wi-Fi)
esphome:
  name: smartspeakername
  friendly_name: SmartSpeakerName

esp32:
  board: esp32dev
  framework:
    type: arduino


# Disable logging
logger:
  level: NONE

# Enable Home Assistant API
api:
  encryption:
    key: "here-should-be-an-api-key"

ota:
  - platform: esphome
    password: "b371b140f68a4f7df40569258ae5840a"

wifi:
  ssid: !secret wifi_ssid
  password: !secret wifi_password
  power_save_mode: NONE

  # Enable fallback hotspot (captive portal) in case wifi connection fails
  ap:
    ssid: "Smartspeaker Fallback Hotspot"
    password: "some-generated-password"

captive_portal:

#Speaker
i2s_audio:
  i2s_lrclk_pin: GPIO27
  i2s_bclk_pin: GPIO25

media_player:
  - platform: i2s_audio
    name: SmartSpeakerPlayer
    dac_type: external
    i2s_dout_pin: GPIO26
    mode: mono
Or in case of multiple networks
esphome:
  name: smartspeakername
  friendly_name: SmartSpeakerName

esp32:
  board: esp32dev
  framework:
    type: arduino


# Enable logging
logger:

# Enable Home Assistant API
api:
  encryption:
    key: "here-should-be-an-api-key"

ota:
  - platform: esphome
    password: "b371b140f68a4f7df40569258ae5840a"

wifi:
  networks:
    - ssid: !secret 1_wifi_ssid
      password: !secret 1_wifi_password
    - ssid: !secret 2_wifi_ssid
      password: !secret 2_wifi_password

  # Enable fallback hotspot (captive portal) in case wifi connection fails
  ap:
    ssid: "Smartspeaker Fallback Hotspot"
    password: "some-generated-password"

captive_portal:

#Speaker
i2s_audio:
  i2s_lrclk_pin: GPIO27
  i2s_bclk_pin: GPIO25

media_player:
  - platform: i2s_audio
    name: SmartSpeakerPlayer
    dac_type: external
    i2s_dout_pin: GPIO26
    mode: mono
5. Build & Flash
- Select your device → INSTALL → choose
somename.factory.bin. - Click Save → Install → Manual Download.
- Select Factory format to download
somename.factory.bin. - Go to web.esphome.io.
- Connect ESP32 via USB,
- Select CP2102 USB to UART in the pop up window.
- Click CONNECT.
- If needed, install CP2102 USB to UART driver (for Windows).
- (CP2102 drivers download page)
Windows drivers - Click on INSTALL Select the previously downloaded somename.factory.bin file.
6. Add to Home Assistant
- Restart Home Assistant.
- Your new device will appear online in ESPHome tab.
- Go to Settings → Devices & Services.
- Click ESPHome → device should be Discovered.
- Click Add → Submit.
Playing a playlist with ESP32 based Media Player
1. Create a Script
alias: S-AmbientList - modhome
sequence:
  - variables:
      playlist:
        - media-source://media_source/local/S-AmbientMusic.mp3
        - media-source://media_source/local/S-AmbientNoise.mp3
        - media-source://media_source/local/S-AmbientMusic.mp3
        - media-source://media_source/local/S-AmbientNoise.mp3
        - media-source://media_source/local/S-AmbientMusic.mp3
        - media-source://media_source/local/S-AmbientNoise.mp3
        - media-source://media_source/local/S-AmbientMusic.mp3
        - media-source://media_source/local/S-AmbientNoise.mp3
        - media-source://media_source/local/S-AmbientMusic.mp3
        - media-source://media_source/local/S-AmbientNoise.mp3
  - repeat:
      for_each: "{{ playlist }}"
      sequence:
        - condition: template
          value_template: >
            {% set current =
            state_attr('media_player.smarts_smartspeakerplayer',
            'media_content_id') %} {{ current is none or current in playlist }}
        - action: media_player.play_media
          data:
            media:
              media_content_id: "{{ repeat.item }}"
              media_content_type: music
              metadata: {}
          target:
            entity_id: media_player.smarts_smartspeakerplayer
        - wait_for_trigger:
            - entity_id: media_player.smarts_smartspeakerplayer
              to: idle
              trigger: state
          continue_on_timeout: true
mode: restart
description: ""