
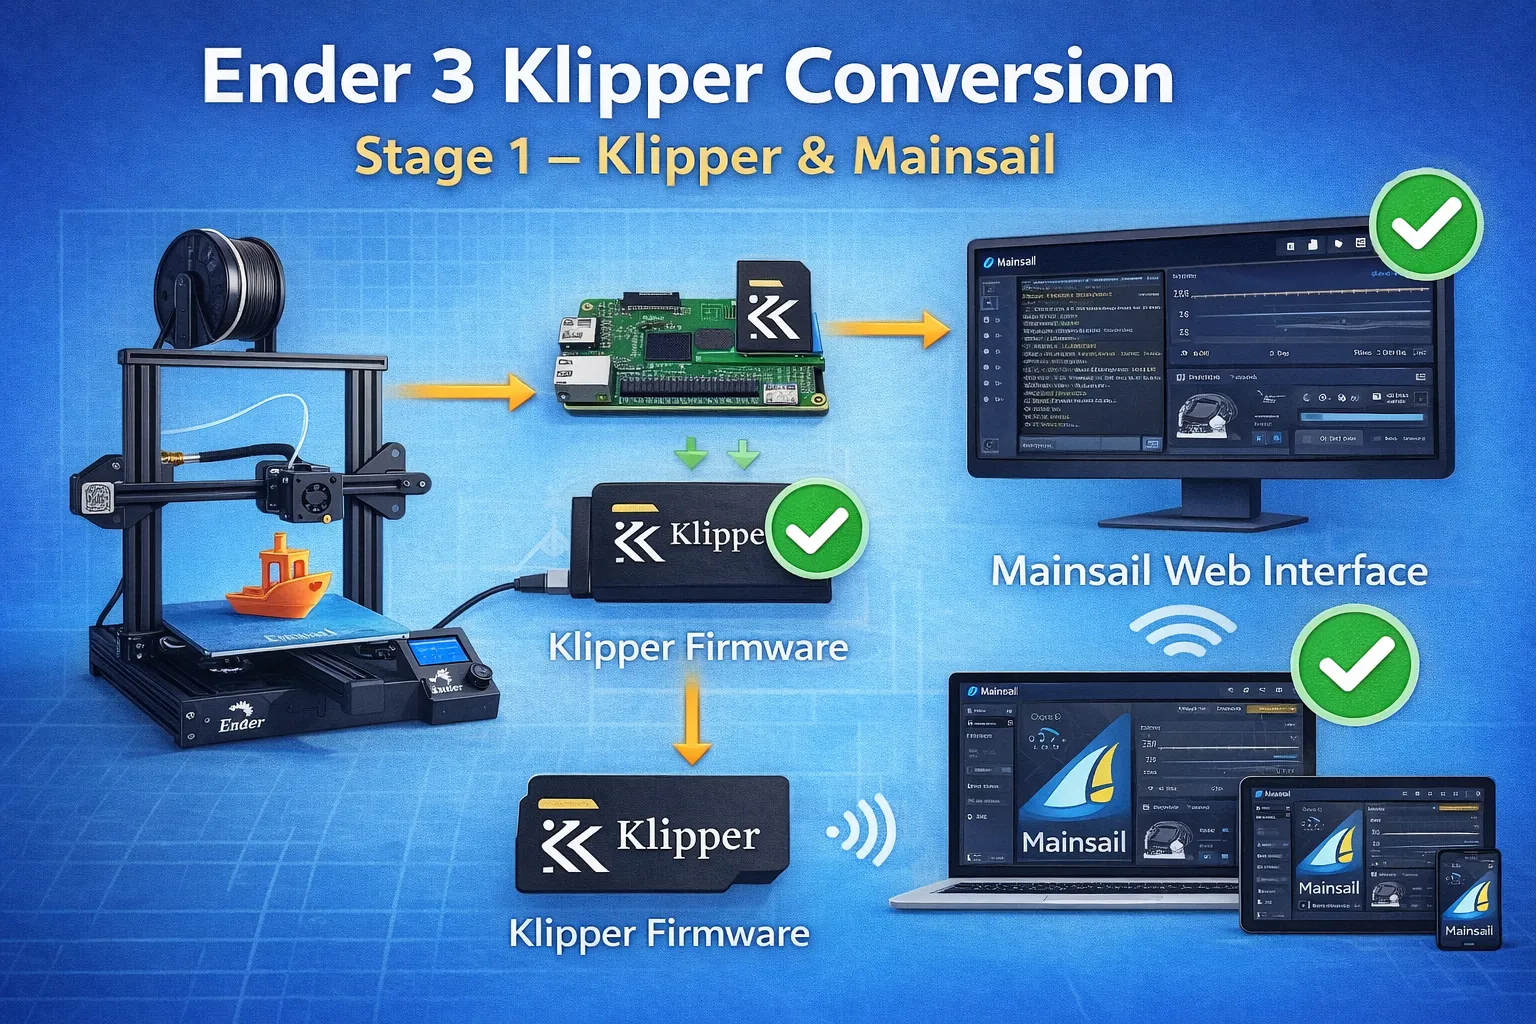
Ender 3 Klipper Conversion – Stage 1 – Klipper & Mainsail
Install Klipper & Mainsail on Bigtreetech SKR MINI E3 V3.0
- Ender 3 Klipper Conversion – Stage 1 – Klipper & Mainsail
Ender 3 Klipper Conversion – Stage 2 – Configure Bed Level Probe
Ender 3 Klipper Conversion – Stage 3 – Extruder Rate & Stepper Motor Calibration
Ender 3 Klipper Conversion – Stage 4 – PID calibration
Ender 3 Klipper Conversion – Stage 5 – Camera Setup & Remote Access
Ender 3 Klipper Conversion – Stage 6 – Macros
Ender 3 Klipper Conversion – Stage 7 – Filament Runout Sensor
Ender 3 Klipper Conversion – Troubleshooting
First BootLearn how to set up MainsailOS after flashing it to your SD card. This guide covers the first boot, accessing Mainsail, and essential configurations for your 3D printer.
Initial boot
After MainsailOS is successfully written to the SD card, please insert the card into your device. Connect necessary peripherals such as network cables, webcams, the USB cable to your 3D printer. Then turn on the device and let it boot up.
The first start of MainsailOS will take some time to expand your file system. The larger the SD card, the longer the first start-up process will take.
Raspberry PI: The green LED indicates SD card activity. As soon as it only flashes occasionally, the process should be completed.
This process can take up to 5 minutes to complete on slower models such as the Pi Zero 2 and Pi 3 series.
Access web interface (Mainsail)
After the boot process has finished, Mainsail will be available at http://mainsailos.local or http://mainsailos. You may need to replace “mainsailos” with the hostname you have chosen while flashing the image.
If accessing Mainsail using the hostname fails, you can try to connect to the device’s IP address directly. Look it up in your router if it’s not known.
Update manager
When you open the Update Manager for the first time, it will show invalid software packages.

Update Manager after the first load
This is a normal behavior because the update manager hasn’t checked for updates until now. To fix this, just hit the refresh button in the top right corner.

Update Manager with Updates
The Update Manager now shows all available updates. Click “Update all components” to start the update and wait until the installation is complete. See the Mainsail documentation for detailed information about the Update Manager.
We recommend updating the system to the current version. Even though we regularly release new versions of the OS, we cannot guarantee that all components (System, Klipper, Moonraker, Mainsail) are up to date when you install the system.
Klipper configuration
MainsailOS is a generic image for all Klipper printers, it does not include any Klipper config file (printer.cfg). With no printer.cfg present, the following error will be reported:

Klipper cannot find a printer.cfg file
Where can I get a printer.cfg?
- Most open-source 3D printer communities provide a
printer.cfgfor their printers. Check the projects GitHub repository or ask at the their Discord server. - A lot of vendors add the config file for their printers to the Klipper Github repository.https://github.com/Klipper3d/klipper/tree/master/config Look for a file matching your printers name and that start with
printer-. - In case you cannot find a fitting
printer.cfgfile or you replaced the printer board by yourself. There a generic board templates in the Klipper repository (https://github.com/Klipper3d/klipper/tree/master/config) to help you getting started. Template’s need adjustments to fit your printer setup (Axis lengths, bed size, etc). Look for files matching your board name and starting withgeneric-.
Upload your printer.cfg
To upload your printer.cfg, open the Machine page in Mainsail and click on the upload button or just drag and drop the file into the config file panel. Pay attention that this file has the name printer.cfg. Only this name will be used by Klipper.
Your printer board must be flashed with Klipper (Guide: https://www.klipper3d.org/Installation.html#building-and-flashing-the-micro-controller), and the serial path to your printer board must also be adjusted in the printer.cfg (Guide: https://www.klipper3d.org/Installation.html#configuring-klipper) so that Klipper can start.
SKR mini E3 V3.0 Klipper Firmware
Required Items
- Klipper must be installed onto the Raspberry Pi
- At least one microSD card needs to be available depending on number of controllers.
Build Firmware Image
- Login to the Raspberry Pi using PUTTY >> mainsail.local
- Run the following:
sudo apt install make
cd ~/klipper
make menuconfig
In the menu structure there are a number of items to be selected.
- Ensure that the micro-controller architecture is set to ‘STM32’
- Ensure that the processor model is set to ‘STM32G0B1’
- Ensure that the Bootloader offset is set to ‘8KiB’
- Ensure that the Clock Reference is set to ‘8 Mhz’
- Ensure that “Enable extra low-level configuration options” is selected.
- Ensure that Communication interface is set to “USB (on PA11/PA12)”.
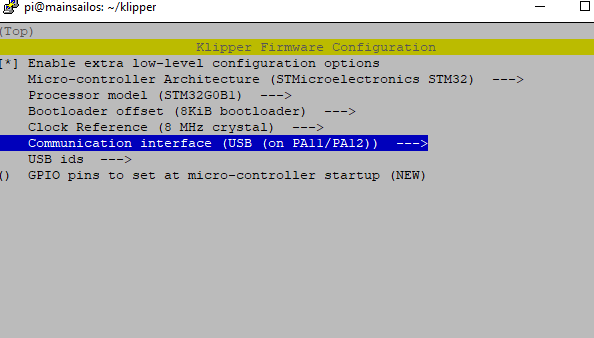
Once the configuration is selected, select “Exit” and “Yes” if asked to save the configuration.
Run the following:
make clean
make
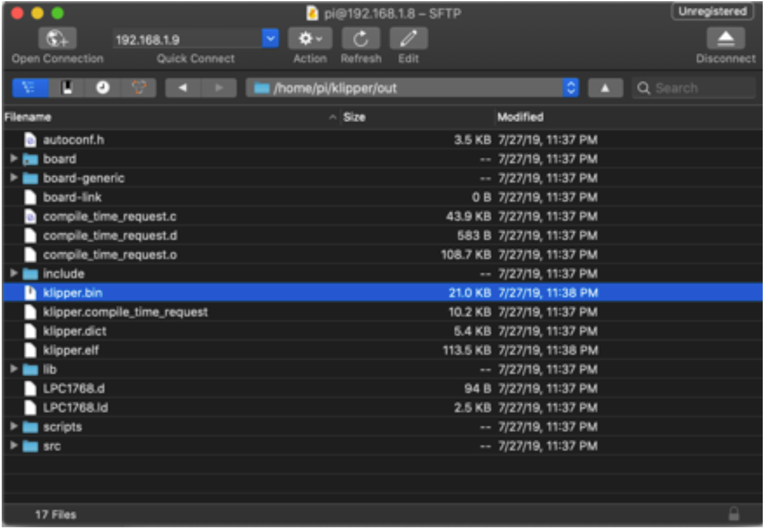
The make command, when completed, creates a firmware file klipper.bin which is stored in the folder /home/pi/klipper/out. This file need to be copied to the Mini E3 board. The easiest way to do this is to use a GUI like WinSCP on Windows or either Cyberduck or scp (from terminal) on Mac to copy the file to your computer.
Load Firmware Image
Copy the klipper.bin to the desktop, then rename it to firmware.bin
Important: If the file is not renamed, the firmware will not be updated properly.
Ensure that the Mini E3 board is not powered, then remove the microSD card that is installed.
Connect the microSD card to the computer with the firmware.bin file. Open the microSD card in the file browser. There may be a file named ‘firmware.cur’; that file can be deleted or left alone. It does not matter because it will be overwritten later.
Copy the firmware.bin from the desktop onto the microSD card. If problems are encountered transferring the file(s) to the microSD card, reformat the microSD card with a FAT32 filesystem and try again.
Replace the microSD card into the Mini E3.
Turn on the power supply to power on the Mini E3 board. If named properly, the SKR will automatically update with the Klipper firmware.
Important: If the Mini E3 is not powered with 12-24V, Klipper will be unable to communicate with the TMC drivers via UART and the Mini E3 will automatically shut down.
you can confirm that the flash was successful, by running ls /dev/serial/by-id. if the flash was successful, this should now show a klipper device, similar to:

(note: this test is not appicable if the firmware was compiled for UART, rather than USB)
Configuring Klipper
The next step is to copy the printer configuration file to the host.
Arguably the easiest way to set the Klipper configuration file is using the built-in editors in Mainsail or Fluidd. These will allow the user to open the configuration examples and save them to be printer.cfg.
Another option is to use a desktop editor that supports editing files over the “scp” and/or “sftp” protocols. There are freely available tools that support this (eg, Notepad++, WinSCP, and Cyberduck). Load the printer config file in the editor and then save it as a file named “printer.cfg” in the home directory of the pi user (ie, /home/pi/printer.cfg).
Alternatively, one can also copy and edit the file directly on the host via SSH. That may look something like the following (be sure to update the command to use the appropriate printer config filename):
cp ~/klipper/config/example-cartesian.cfg ~/printer.cfg
nano ~/printer.cfg
It’s common for each printer to have its own unique name for the micro-controller. The name may change after flashing Klipper, so rerun these steps again even if they were already done when flashing. Run:
ls /dev/serial/by-id/*
It should report something similar to the following:
/dev/serial/by-id/usb-1a86_USB2.0-Serial-if00-port0
Then update the config file with the unique name. For example, update the [mcu] section to look something similar to:
[mcu]
serial: /dev/serial/by-id/usb-1a86_USB2.0-Serial-if00-port0
After creating and editing the file, it will be necessary to issue a “restart” command in the command console to load the config. A “status” command will report that the printer is ready if the Klipper config file is successfully read and the micro-controller is successfully found and configured.
When customizing the printer config file, it is not uncommon for Klipper to report a configuration error. If an error occurs, make any necessary corrections to the printer config file and issue “restart” until “status” reports the printer is ready.
Klipper reports error messages via the command console and pop-ups in Fluidd and Mainsail. The “status” command can be used to re-report error messages. A log is available and usually located at ~/printer_data/logs/klippy.log.
Firmware Updates
It is a normal and expected behavior, that updating klipper (on the pi) will sometimes also require you to update the klipper firmware on the SKR mini. Klipper will not do this for you automatically. One option is to simply repeating the full flashing process as seen above. However, this is often inconvenient, since it requires physical access to the MCU.
Instead, you can update the SKR mini over USB, using DFU:
The technique shown below only applies to updating an mcu which is already running klipper firmware. It cannot be used for new installs
- build the firmware, as shown above
- Determine the full ID of your MCU, either from printer.cfg, or from the command
ls /dev/serial/by-id/*. It should look something like/dev/serial/by-id/usb-Klipper_stm32g0b1xx_1D0004001050563046363120-if00 - run the commands:
sudo service klipper stop cd ~/klipper make flash FLASH_DEVICE=<insert serial id here> sudo service klipper start
so, with our example serial ID, the 3rd line would look like:
make flash FLASH_DEVICE=/dev/serial/by-id/usb-Klipper_stm32g0b1xx_1D0004001050563046363120-if00FILAMENT sensor
https://www.klipper3d.org/Config_Reference.html#filament_switch_sensor
https://docs.vorondesign.com/community/electronics/120decibell/filament_runout_sensor.html
https://ellis3dp.com/Print-Tuning-Guide/articles/useful_macros/pause_resume_filament.html