
Raspberry Pi 4 Immich Server
Setup and settings for an 8GB RPI 4 Immich server with SSD and External HDD.
Installing Docker to the Raspberry Pi
Thanks to a nifty install script developed by the Docker team, installing the container software is incredibly simple.
You can even complete the following steps by using an SSH connection to your Raspberry Pi.
1. Our first task is to update all our existing packages before we proceed to install Docker.
We can upgrade all existing packages by running the following two commands on the Raspberry Pi.
sudo apt update
sudo apt upgrade -y
2. With our Raspberry Pi entirely up to date, we can now go ahead and install Docker to the Raspberry Pi.
Luckily for us, Docker has made this process incredibly quick and straightforward by providing a bash script that installs everything for you.
You can download and run the official Docker setup script by running the following command.
curl -sSL https://get.docker.com | shThis command will pipe the script directly into the command line. Typically, it’s best not to do this; however, Docker is a trusted source.
If you are unsure about running this directly without first inspecting it, you can go directly to get.docker.com to view the script.
This script can take some time to complete because it automatically detects and installs everything needed to run Docker on the Raspberry Pi.
Setting up your User for Docker
We need to make a slight adjustment to our user account before we can use Docker without issues.
To help make your experience of using Docker on your Raspberry Pi a bit simpler, there is one little adjustment that we will want to make.
These adjustments will help you better with the Linux permission system and will enable your current user to interact with Docker. By default, only the Docker user and the root user will be able to interact wit the Docker runtime.
1. Once Docker has finished installing on your Raspberry Pi, there are a couple more things we need to do.
For another user to be able to interact with Docker, it needs to be added to the docker group.
So, our next step is to add our current user to the docker group by using the usermod command as shown below. By using “$USER” we are inserting the environment variable that stores the current users name.
sudo usermod -aG docker $USERIf we don’t add our user to the group, we won’t be able to interact with Docker without running as the root user.
If you want to learn more about permissions and groups in Linux, check out our file permissions in Linux guide.
2. Since we made changes to our users’ groups, we will have to do one of two things. We can either log out and log back in or just restart the device.
If you are using a terminal-only version of Raspberry Pi OS to run Docker, then you can simply run the command below to log out. Otherwise, you will need to use the desktop interface to log out.
logoutAlternatively, you can just restart your Raspberry Pi to ensure that the group changes stick. Restarting from the terminal is as simple as running the command below.
sudo reboot3. Once you have either logged back in or your device has restarted, we can verify that the Docker group has been added successfully by using the following command within the terminal.
This command lists the groups the current user is a member of.
groupsIf everything has worked correctly, you should see “docker” in the list of groups.
pi adm dialout cdrom sudo audio video plugdev games users netdev lpadmin docker gpio i2c spi render input
Testing the Docker Installation on Raspberry Pi
With Docker now set up and running on our Raspberry Pi, we can run a quick test to verify it’s working correctly.
1. The easiest way to verify that Docker is working on our Pi is to download and run a container. Luckily for us, the Docker team provides a container designed for this exact purpose.
Running the command below will download, set up, and run the container called “hello-world“. Since we aren’t specifying a repository, this container will be downloaded from Docker Hub.
docker run hello-world2. If you have successfully installed Docker on your Raspberry Pi, you should see a giant message that indicates to you that everything is working as intended.
It also gives you an idea of how Docker operates and the steps required for the image to run on your device.
For example, from this we can see that we pulled the ARM64 image of the “hello-world” container. If you were running this on a 32-bit system, the output would look a little different.
Hello from Docker!
This message shows that your installation appears to be working correctly.

To generate this message, Docker took the following steps:
 1. The Docker client contacted the Docker daemon.
 2. The Docker daemon pulled the "hello-world" image from the Docker Hub.
    (arm64v8)
 3. The Docker daemon created a new container from that image which runs the
    executable that produces the output you are currently reading.
 4. The Docker daemon streamed that output to the Docker client, which sent it
    to your terminal.

To try something more ambitious, you can run an Ubuntu container with:
 $ docker run -it ubuntu bash

Share images, automate workflows, and more with a free Docker ID:
 https://hub.docker.com/

For more examples and ideas, visit:
 https://docs.docker.com/get-started/
https://pimylifeup.com/raspberry-pi-docker
IMMICH:
Preparing Raspberry Pi for Immich
1. Before we install Immich on our Raspberry Pi, we should ensure our current system is up to date.
We can update the package list and then upgrade any out-of-date packages by using the following command.
sudo apt update
sudo apt upgrade
2. Our next step is to ensure that the wget package is installed on our system by using the command below.
We will use wget later to grab the Docker compose file and the environment configuration file.
sudo apt install wget3. We now need to install Docker so that we can easily run Immich on our device.
Please follow our guide on installing Docker to the Raspberry Pi to get this set up correctly.
4. After installing Docker, we can now create some directories where we will store the configuration files for Immich.
Create a directory called immich within the “/opt/stacks/” directory by using the mkdir command.
sudo mkdir -p /opt/stacks/immich5. With the directory now created, we can change into it by using the cd command.
cd /opt/stacks/immichSetting up the Docker Compose File
6. Luckily, the Immich team provided the Docker Compose file for us. All we need to do is download the file from their GitHub.
You can use wget to save this Docker compose file by running the command below.
sudo wget https://github.com/immich-app/immich/releases/latest/download/docker-compose.ymlWriting the Environment File for Immich
7. Now that we have the Docker compose file for Immich saved to our Raspberry Pi, we can move on to its environment file.
Immich’s Docker container uses this environment file to set itself up. Download the placeholder version of this file to your Pi by using the command below.
sudo wget -O .env https://github.com/immich-app/immich/releases/latest/download/example.envWe use the “-O” option so we can save this file as “.env” rather than “.example.env“.
8. Our next step is to begin editing this environment file to suit our needs better. The default settings will work but can be insecure and might save your images to a location you don’t want to use.
sudo nano .enva. The first setting you will likely want to change is the upload location. This setting tells Immich where it should save files on your Raspberry Pi.
As images can very quickly take up a large amount of space, you will likely want to set this location to an external drive with ample space.
UPLOAD_LOCATION=./libraryb. The final value you need to set is the password Immich will use to interact with the Postgres database.
You will want to replace “postgres” with a secure long password.
DB_PASSWORD=postgres9. After making these changes to the environment file, you can save and quit by pressing CTRL + X, followed by Y, and then the ENTER key.
Starting Immich on your Raspberry Pi
10. We can now finally start up Immich on our Raspberry Pi by using the following command.
After running this, Immich will be downloaded to your Pi alongside the various services that it relies on. Depending on your internet connection, this may take a few minutes to complete.
docker compose up -dBy using the “-d” option, we are telling Docker to detach from the current terminal after it has started.
Accessing the Immich Web Interface
11. With Immich now up and running on your Raspberry Pi, we can access its web interface.
Ensure you replace “<YOURIPADDRESS>” with the IP of your Raspberry Pi. If you are unsure what your IP is, you can use the “hostname -I” command.
http://YOURIPADDRESS:228312. When you first access Immich, you will be greeted with the following screen.
To proceed, you must click the “Getting Started” button.

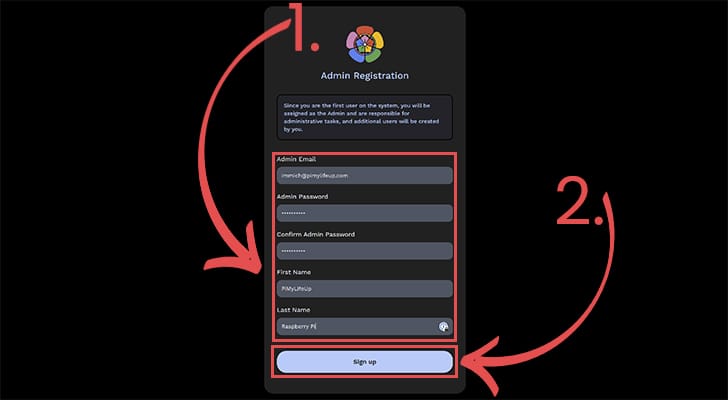
13. Next, you will be asked to create your admin account for Immich. Use the boxes to fill in the details for your admin account (1.).
After filling out your information, click the “Sign up” button (2.).
14. At this point, you can now log in to your new admin account by using the email and password you just set (1.).
After filling out your information, click the “Login” button (2.).
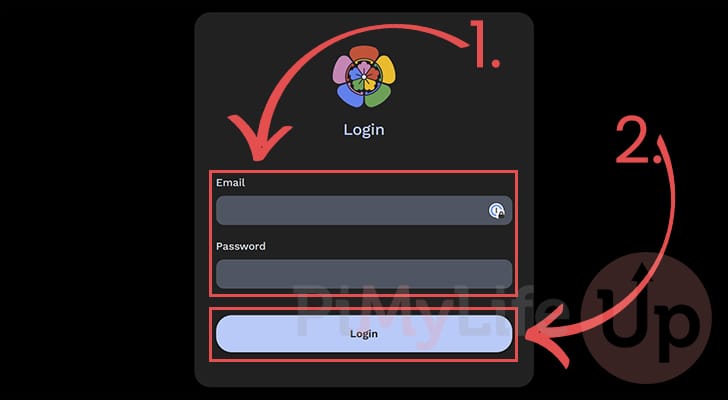
15. You now have access to Immich running on your Raspberry Pi.
You can start uploading your images, create new accounts, and more.

Updating Immich on the Pi
Immich is a software that gets updated fairly often, so you will want to know how to update it.
Luckily, since we are running it as a Docker container, updating Immich on your Raspberry Pi is a really simple process.
1. First, you need to ensure you are in the Immich directory we created earlier on in this guide.
Change to this directory by running the command below.
cd /opt/stacks/immich2. Once we are in the correct directory, we can use Docker compose to pull the new Immich container to your Raspberry Pi.
All we need to do to pull the new images is to use the following command.
docker compose pull3. After pulling a new version of the container, you need to restart Immich by using the command below in your terminal.
docker compose up -dhttps://pimylifeup.com/raspberry-pi-immich
Troubleshooting:
Cheap sata to usb3 converters are not always compatible with usb3. Use usb2 port on rpi!
Ugreen 12V input SATA to USB3 adapter works. There are two types. One with included charger and one without the charger. This build used the adapter only type.
Find immich – docker install folder:
sudo find / -name "docker-compose.yml" -path "immich" 2>/dev/nullWhen the results are back cd into the install directory then check docker status:
cd /opt/stacks/immich
sudo docker compose ps
After sudden power loss Immich doesn’t recognize the external hdd.
Add a delay so the hard drive has time to spin up.
Find the external hdd unique identifier:
lsblk -o NAME,FSTYPE,UUID,SIZE,MOUNTPOINTModifiy the fstab so the hdd has enough time to spin up:
sudo nano /etc/fstabbackup: UUID=34ad26a2-8009-4334-8aca-bbd150882bc6 /mnt/immich1 ext4 defaults,nofail,x-systemd.device-timeout=1 0 2
UUID=34ad26a2-8009-4334-8aca-bbd150882bc6 /mnt/immich1 ext4 defaults,nofail,x-systemd.device-timeout=40s,x-systemd.mount-timeout=40s 0 2Prevent docker from starting early
sudo systemctl edit docker.servicePaste this:
[Service]
RequiresMountsFor=/mnt/immich1